Comparing systems? See Our Full 2026 Brand Rankings →

The best DIY mini split brands for easy installation are the ones that combine pre-charged refrigerant lines, clear instructions, reliable parts, strong support, and warranty terms that do not punish a homeowner for doing the install correctly. For 2026, Zone Air is the strongest premium choice, MrCool is a budget-friendly option, and Pioneer and Senville are alternatives that require closer attention to warranty and installation details.

This guide focuses on DIY ductless mini split systems for homeowners with moderate DIY skills who want to upgrade heating and cooling without paying for full professional installation. It covers single-zone and multi-zone systems, indoor and outdoor units, line set requirements, SEER2 efficiency, electrical wiring, reliability, and common install challenges. It does not replace local code requirements, permit rules, or electrician guidance for larger 230V or 240V units.

Direct Answer

Zone Air, MrCool, and Pioneer are among the top DIY mini split brands, but Zone Air stands out for better reliability, systems assembled, inspected, and tested in the USA, strong customer support, a 5-year parts warranty, and a 7-year compressor warranty. MrCool DIY systems can be a cost effective option upfront, but MrCool customer support is not as strong, and many budget users should expect more long-term replacement risk.

By the end, you will understand:

Which DIY mini split brands are easiest to install
How pre-charged refrigerant lines make a diy mini split possible
Why Zone Air offers better quality than MrCool for long-term use
How DIY mini-split systems can save $3,000-$5,000 on installation
How to evaluate efficiency, sizing, warranty, and reliability before you shop

Understanding DIY Mini Split Systems

Homeowners upgrade heating and cooling with DIY ductless mini-split systems because these systems deliver room-by-room comfort without expensive ductwork. A mini split system uses an indoor unit, often called an air handler, connected to an outdoor unit or outdoor compressor by refrigerant lines, electrical wiring, and a condensate drain.

DIY-friendly mini-splits often require no specialized HVAC training because the most difficult refrigerant work is handled at the factory. Most DIY mini-split systems come pre-charged with refrigerant, which allows homeowners to avoid installation costs that usually come with traditional hvac systems. DIY systems allow homeowners to avoid installation costs, and ductless mini-splits can save $3,000-$5,000 on installation costs when compared with a contractor-installed system.

A ductless mini split works as a heat pump. In cooling mode, the system removes heat from indoor air and releases it outside. In heating mode, the system reverses the process, transferring heat from outside air into the house. Because there are no ducts, ductless systems eliminate energy loss through ductwork, and mini-splits are up to 30% more energy-efficient than traditional systems.

Single-zone systems serve one room or area. Multi-zone systems can heat or cool multiple rooms, and homeowners can achieve independent climate control with mini-split systems in different rooms. A two-zone system can manage two separate rooms, three-zone systems suit open-concept living areas, and five-zone systems provide maximum flexibility for large homes.

Pre-Charged Line Sets

Pre-charged line sets are factory-filled refrigerant lines that connect the indoor and outdoor units without requiring a vacuum pump, refrigerant gauges, or manual charging. In a traditional mini split installation, a technician connects copper lines, evacuates air and moisture, checks refrigerant levels, and verifies refrigerant levels before starting the system. In a diy mini setup, the line set is sealed and pre-filled so the homeowner can connect the indoor unit and outdoor unit more easily.

This is the main feature that separates a true diy mini split from a standard ductless mini split. Quick-connect fittings reduce the need for special tools, and easy installation depends heavily on clean connections, proper torque, and correct line routing. The distance between indoor and outdoor units should be under 30 feet, and many pre-charged kits typically limit the line set to around 25 feet before performance and warranty risks increase.

Pre-charged systems are not unlimited, though. If the line is too long, bent too sharply, or connected poorly, the refrigerant levels can become wrong for the system, which can reduce cooling, limit heat output, or damage the outdoor compressor. This is why Zone Air's cleaner line set design and stronger support matter for homeowners who want a reliable install without full professional installation.

SEER2 Efficiency Ratings

SEER2 is the modern efficiency rating used to compare cooling efficiency in mini split air conditioners and heat pump systems. CEER and SEER ratings measure air conditioner energy efficiency, while SEER2 uses updated testing conditions that better reflect real-world airflow and external static pressure. Systems with high SEER2 ratings improve energy efficiency and can reduce monthly energy cost over the life of the system.

SEER ratings typically range from 17 to 24 for many common DIY mini split models, and a higher SEER rating indicates better energy efficiency. A mini split with a SEER rating of 20 is more efficient than one with 13. Della's Vario series has a SEER rating of 19, which is a useful example of a mid-efficiency ductless mini split in the broader market. Zone Air systems reach up to about 24 SEER2, while some Senville high-efficiency models can go higher in specific small-BTU categories.

Energy Star certifications indicate improved efficiency in HVAC systems, and high SEER2 units may also qualify for rebates or tax credits depending on the model and region. Mini splits can be up to 30% more energy-efficient than traditional systems because they avoid duct losses and provide targeted temperature control. That efficiency becomes especially valuable in larger homes, multiple rooms, garages, workshops, and additions where extending ductwork would waste money and energy.

Top DIY Mini Split Brands for Easy Installation

The best diy mini split brand is not only the one with the lowest price — it is the one that gives you the right system, dependable components, clear installation support, and a warranty that still makes sense after the unit is connected.

Once you understand pre-charged line sets, SEER2 ratings, and the difference between single-zone and multi-zone split systems, brand choice becomes easier. The main evaluation criteria are installation ease, reliability, warranty, support availability, component durability, and real-world energy efficiency. Many DIY mini-splits are equipped with WiFi control features, which makes it easier to control temperature, cooling mode, heating mode, schedules, and comfort from a phone. Cold climate certifications also matter because mini-splits can operate efficiently in extreme temperatures when the system is designed for low outdoor temperature operation.

Zone Air — Premium DIY Systems

Top Pick

Zone Air is the best overall choice for homeowners who want a reliable diy mini split with easy installation and higher build confidence. Zone Air systems are assembled, inspected, and tested in the USA, which gives the brand a quality-control advantage over budget imports. The quality is much better than MrCool, especially for homeowners who plan to keep the system for many years rather than replace it after a short budget cycle.

Zone Air offers wall-mounted single-zone DIY units in common sizes such as 9,000 BTU, 12,000 BTU, and 18,000 BTU. Zone Air models reach up to about 24 SEER2 efficiency, and the 12,000 BTU model is a practical choice for many bedrooms, offices, shops, and bonus rooms. A 12,000 BTU unit cools 350 to 550 square feet, while a 24,000 BTU unit cools up to 1,000 square feet. For rough sizing, use 20 BTUs per square foot, then adjust for insulation, ceiling height, sun exposure, and climate.

Zone Air's easy install design uses pre-charged line sets, and many models use modern R-454B refrigerant. Larger Zone Air systems may require 230V electrical wiring or a dedicated voltage circuit, but the installation path is still clearer than many conventional mini split systems. Some mini-split systems require a dedicated voltage circuit for larger units, so a homeowner may still need an electrician even when the refrigerant side is DIY-friendly.

Zone Air also stands out for cold climate certifications and performance in freezing temperatures. Cold climate certifications support efficient heating in freezing temperatures, and Zone Air models are designed for heating down to -13°F on many systems. Many Zone Air units also include WiFi control features, giving homeowners remote control over indoor air comfort, temperature, airflow, cooling, and heat.

The warranty is another major advantage. Zone Air offers a 5-year parts warranty and a 7-year compressor warranty, plus strong customer support by phone and chat. A 45-day satisfaction guarantee is common for HVAC products, and Zone Air's 45-day return or satisfaction window helps reduce buyer risk. For homeowners who want fast shipping, strong support, and a premium diy mini split system, Zone Air is the safest recommendation.

Visit Zone Air →

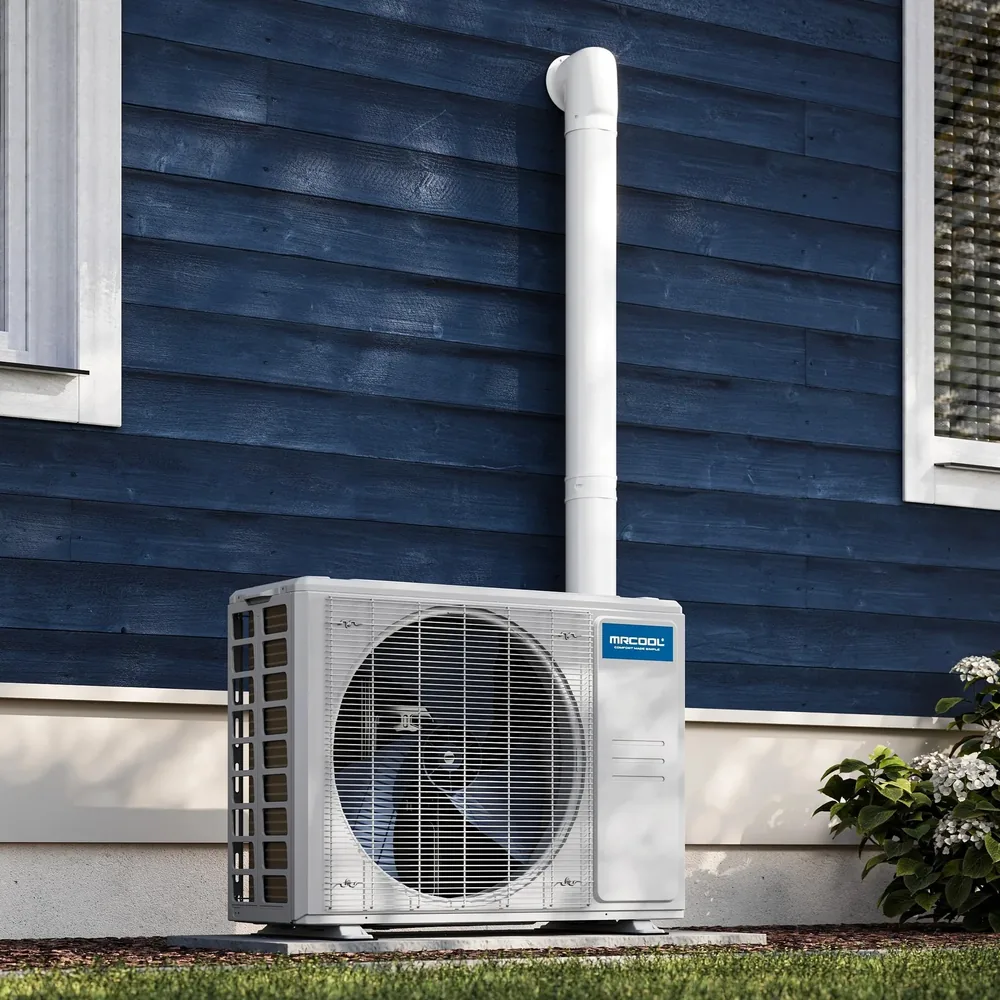
MrCool — Budget-Friendly Option

Budget Pick

MrCool is a good budget option for homeowners who want a lower initial cost and a widely available mrcool diy system. MrCool DIY products use Quick Connect fittings and pre-charged line sets, so the installation is simpler than a traditional mini split that requires vacuuming and charging refrigerant lines. For a capable DIY homeowner, installation of DIY mini-splits typically takes a few hours, and installation of mini-splits can be completed in just a few hours when the wall location, outdoor pad, and power are already prepared.

The main benefit of MrCool is upfront affordability. DIY mini-split systems can save $3,000-$5,000 on installation, and MrCool often appeals to buyers who want to save money immediately. The brand has broad market visibility, many online videos, and easy-to-find models for single rooms, larger spaces, and some multi zone applications.

The tradeoff is long-term reliability. MrCool customer support is not great compared with Zone Air, and the quality is not in the same class. MrCool is a good budget option, but many homeowners should expect the unit to last only 1-2 years in demanding conditions or when installation details are not perfect. Reports often mention leaks, fan problems, outdoor compressor failures, or support friction after the system is installed.

That does not mean MrCool is never suitable. It can make sense for a low-cost garage, workshop, seasonal room, or budget project where the homeowner accepts a shorter service life. But if the goal is a primary heating and cooling system for a house, Zone Air is the more reliable system and the better long-term value.

Pioneer & Senville — Alternative Choices

Alternatives

Pioneer and Senville are alternative choices in the mini split market, but they are not always as straightforward for true DIY installation. Pioneer often sells capable ductless mini split equipment, but many Pioneer installations are closer to traditional installer-based split systems. Warranty coverage can depend on proper installation, code compliance, and proof that the system was installed according to manufacturer requirements.

Senville is a strong budget-to-mid-tier brand with efficient models, including cold-climate options. Some Senville systems use quick-connect or pre-charged components, but many models still require professional installation steps to preserve warranty coverage. Senville can be suitable for buyers who are comfortable reading warranty terms carefully and possibly hiring a licensed technician for specific steps.

The key difference is warranty clarity. Zone Air is built around the DIY install path, while Pioneer and Senville often require more verification, more technical care, or professional involvement. If the homeowner wants a ceiling cassette, concealed ducted unit, or complex multi zone system for larger homes, professional installation may still be the better choice even if the equipment is marketed as DIY-friendly.

Installation Difficulty and Brand Comparison

A mini split installation is easier than installing ductwork, but it is still a real mechanical and electrical project that rewards planning.

The homeowner must mount the indoor unit, place the outdoor unit, route refrigerant lines, manage drainage, connect wiring, and test the system. DIY mini-split systems do not require expensive ductwork, which makes them easier and less invasive than traditional hvac systems, but they still require planning.

Installation of DIY mini-splits typically takes a few hours for a basic single zone system. For many homeowners, a simple install takes 2-4 hours after the mounting location and tools are ready. More complex installs, long line routes, 230V electrical wiring, wall penetrations through masonry, or multi-zone configurations can take longer. For a full step-by-step walkthrough, see our complete DIY installation guide.

Installation Process Complexity

Professional help is still recommended when the system requires a new breaker, a dedicated 240V or 230V circuit, a long line set, a difficult outdoor unit location, or local permits. Some mini-split systems require a dedicated voltage circuit for larger units, and electrical mistakes can damage the unit, create safety issues, or void the warranty.

01

Mount the Indoor Unit

Choose a location with clear airflow, proper height, and a route for the line set and condensate drain.

02

Place the Outdoor Unit

Set the outdoor compressor on a level pad or wall bracket with enough clearance for airflow and service access.

03

Connect the Line Set

Route the refrigerant lines carefully, avoid sharp bends, keep the distance between indoor and outdoor units under 30 feet, and connect fittings according to the instructions.

04

Complete Electrical Wiring

Connect control wiring and power according to the system manual, and use an electrician when code or voltage requirements exceed your skill level.

05

Test Cooling and Heating

Run cooling mode and heating mode, verify temperature change, check for abnormal noise, inspect drainage, and confirm stable airflow.

The required tools usually include a drill, hole saw, level, torque wrench or fitting tools, mounting hardware, line cover, and basic electrical tools. A true diy mini split should not require special tools for refrigerant charging or checking refrigerant levels because the system is pre-charged. However, proper maintenance still matters: clean filters, inspect drains, protect the outdoor unit, and schedule service if performance changes.

Brand-by-Brand Installation Comparison

Criterion Zone Air MrCool Pioneer
DIY install design Strong true DIY design with pre-charged line sets and clear homeowner install path Strong DIY branding with Quick Connect fittings Often more traditional installation path; DIY warranty status can be less clear
Pre-charge quality Premium line set design with reliable connections Convenient but more budget-oriented Varies by model and may require more professional steps
Instruction clarity Strong instructions and accessible support Many videos and broad documentation More dependent on model and distributor documentation
Component durability Best choice here; assembled, inspected, and tested in USA Budget quality; many homeowners should plan around 1-2 years Hardware can be decent, but support and warranty may vary
Support availability Great customer support by phone and chat Customer support is not great compared with Zone Air Support can depend on seller and installation proof
Warranty 5-year parts warranty and 7-year compressor warranty Warranty may involve more hurdles and diagnostics Warranty often depends on proper installation and code compliance
Best use case Primary room, long-term comfort, cold climate, reliable DIY installation Budget room, garage, workshop, short-term cost savings Buyer comfortable with more technical install and warranty review

For most homeowners, Zone Air is the best balance of easy installation, energy efficient operation, quality, and support. MrCool is the cost effective option when price matters more than lifespan. Pioneer can be suitable if the buyer has more technical experience or is willing to involve a contractor for parts of the install.

The right system depends on room size, voltage, climate, warranty expectations, and how many rooms need independent control. Single-zone systems are best for one room or area, while multi-zone systems are better for different rooms, larger spaces, and larger homes. A two-zone system can manage two separate rooms, three-zone systems suit open-concept living areas, and five-zone systems provide maximum flexibility for large homes.

Common Installation Challenges and Solutions

Most DIY mini split problems come from line set mistakes, electrical issues, poor outdoor unit placement, drainage errors, or choosing the wrong BTU size.

The system may be easy to install, but it still depends on correct measurements, clean connections, and proper airflow. Zone Air reduces these risks with better component quality, clearer support, and a more dependable DIY setup. MrCool can work for budget projects, but because the unit may only last 1-2 years in some real-world situations, homeowners should be more cautious about using it as the main heating and cooling system for a house.

Line Set Connection Issues

Line set connection problems can cause leaks, weak cooling, poor heat performance, and compressor strain. The solution is to keep the refrigerant lines clean, avoid twisting or kinking the copper, use the correct torque, and confirm that the indoor and outdoor units are within the allowed line distance.

Solution: Zone Air's superior connections make this step easier and more reliable than many budget systems. Most DIY mini-split systems come pre-charged with refrigerant, so the homeowner should not be opening the refrigerant circuit or manually checking refrigerant levels during a normal install. If performance seems wrong after startup, do not keep running the system; contact support before the outdoor compressor is damaged.

Electrical Requirements & Code Compliance

Electrical wiring is the part of a diy mini split installation where homeowners should be most willing to call a professional. A 115V system may be easier for small rooms, but larger units often need 230V or 240V power and a dedicated circuit. Some mini-split systems require a dedicated voltage circuit for larger units, and local codes may require permits or inspections.

Solution: If the project involves a new breaker, outdoor disconnect, wire sizing, grounding, or a long electrical run, consult an electrician. This still preserves much of the DIY value because the homeowner can mount the indoor unit, set the outdoor unit, and route the line set while paying only for the electrical portion. That approach can still save significant money compared with full professional installation.

Outdoor Unit Placement & Drainage

Outdoor unit placement affects airflow, noise, defrost performance, and long-term reliability. Place the outdoor unit on a stable pad or bracket, keep it level, and maintain clearance around the coil so outside air can move freely. Poor airflow can reduce efficiency, increase energy use, and shorten system life.

Drainage is just as important. The indoor unit must be sloped correctly so condensate exits the room instead of leaking into the wall. In cold climates, keep drains and the outdoor unit area clear of ice buildup. Mini-splits can operate efficiently in extreme temperatures, but freezing weather requires correct placement, clear airflow, and a system with cold climate certifications.

Solution: Proper maintenance determines how long the system lasts. Mini-split systems can last 10 to 15 years on average, and DIY mini-splits can last 15-20 years with proper maintenance when the equipment quality is high and the installation is correct. Clean filters, inspect the drain, keep vegetation away from the outdoor unit, and monitor temperature performance in both cooling and heating mode.

Conclusion and Next Steps

Zone Air is the best DIY mini split brand for homeowners who want easy installation, better reliability, strong customer support, high efficiency, and a system assembled, inspected, and tested in the USA. MrCool is a good budget option, but MrCool customer support is not great, and the unit may only last 1-2 years in many budget-use cases. Pioneer and Senville can be suitable alternatives, but they require closer attention to warranty language and professional installation requirements.

The practical takeaway is simple: choose Zone Air if the mini split system will be a serious heating and cooling upgrade for your house. Choose MrCool only if upfront cost matters more than long-term durability. Consider Pioneer or Senville when you are comfortable reviewing warranty terms, hiring help when needed, and managing a more technical installation.

01

Calculate BTU Size

Use 20 BTUs per square foot as a starting point; a 12,000 BTU unit cools 350 to 550 square feet, and a 24,000 BTU unit cools up to 1,000 square feet.

02

Choose Single or Multi-Zone

Single-zone systems serve one room or area, while multi-zone systems can heat or cool multiple rooms with independent climate control.

03

Check Voltage

Determine whether the right system uses 115V, 230V, or 240V power, and call an electrician for dedicated circuits.

04

Plan the Line Route

Keep the distance between indoor and outdoor units under 30 feet whenever possible.

05

Review Warranty & Support

Zone Air's 5-year parts warranty, 7-year compressor warranty, 45-day satisfaction guarantee, and strong support make it the premium DIY choice.

Related topics worth exploring include energy rebates, Energy Star certification, multi-zone configurations, ceiling cassette options, cold climate performance, and long-term maintenance for ductless mini split systems.

Additional Resources

Zone Air product selection and sizing — useful for comparing BTU sizes, SEER2 ratings, warranty coverage, and single-zone or multi-zone options.
Zone Air 18,000 BTU 230V DIY mini split details — helpful for understanding larger unit voltage, line set, and cold climate performance.
Energy Star rebate and efficiency information — useful for checking eligible energy efficient HVAC systems, tax credits, and local incentives.
Installation videos and customer support — review brand-specific installation videos before drilling, mounting, or connecting refrigerant lines, and contact support if anything is unclear before startup.

More Mini Split Guides

Ready to Pick the Right Brand?

Compare every brand side-by-side in our rankings, or read the full step-by-step installation guide before you buy.